Launching First Kubernetes Cluster with Nginx | #Day 31 of | #90days of DevOps


1. What is Minikube? 🐾
Minikube is a lightweight, open-source tool designed for developers and DevOps engineers to run a single-node Kubernetes cluster on their local machine. It's perfect for testing and developing Kubernetes applications without the need for a full-scale cluster. Minikube provides a quick and easy way to get hands-on experience with Kubernetes.
2. Features of minikube
(a) Supports the latest Kubernetes release (+6 previous minor versions)
(b) Cross-platform (Linux, macOS, Windows)
(c) Deploy as a VM, a container, or on bare-metal
(d) Multiple container runtimes (CRI-O, containers, docker)
(e) Direct API endpoint for blazing-fast image load and build
(f) Advanced features such as LoadBalancer, filesystem mounts, FeatureGates, and network policy
(g) Addons for easily installed Kubernetes applications
(h) Supports common CI environments
3. How to Install Minikube on AWS EC2 Ubuntu? ☁️
Step 1: Set Up an AWS EC2 Instance
Launch an AWS EC2 instance running Ubuntu.
Make sure you have SSH access and the necessary security group rules for ports 22 (SSH) and 80 (HTTP), which have 2GB of free memory, 2CPU, 20GB of free disk space.
Step 2: Install Prerequisites
SSH into your EC2 instance.
Update the package list:
sudo apt update.Install Docker, which is the container runtime that
minikubeuses by default. You can use the official script from Docker to install it with the command:sudo apt install docker.io.Add your user to the docker group so that you can run docker commands without sudo. You need to log out and log in again for this change to take effect. You can do this with the command:
sudo usermod -aG docker $USER && usermod docker.
Step 3: Install kubectl
Download and install kubectl:
Install
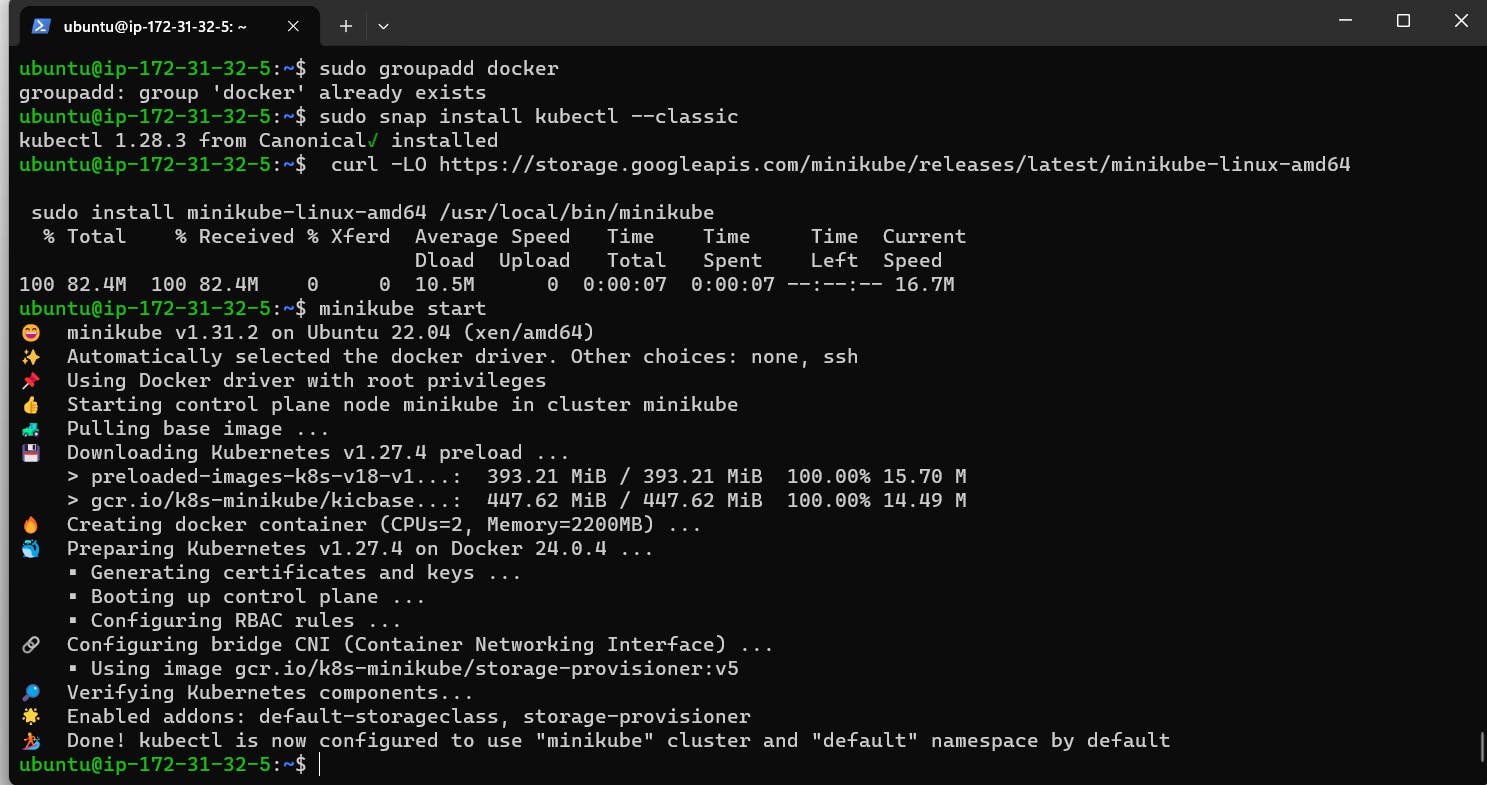
kubectl, which is the command-line tool for interacting with Kubernetes clusters.sudo snap install kubectl --classic
Step 4: Install Minikube
Download and install Minikube:
Install
minikube, which is the main tool for creating and managing local Kubernetes clusters. You can download the latest version from the GitHub releases page and make it executable with the commands:curl -LO "https://storage.googleapis.com/minikube/releases/latest/minikube-linux-amd64" sudo install minikube-linux-amd64 /usr/local/bin/minikube
Step 5: Start Minikube
Start Minikube:
minikube start.Verify that
minikubeis running and that you can connect to the cluster withkubectlwith the command:minikube status && kubectl get nodes.
You now have Minikube up and running on your AWS EC2 Ubuntu instance. 🎉
3. What is a Pod? 🌿
In the Kubernetes world, a Pod is the smallest deployable unit. It's a logical collection of one or more containers that share network and storage resources and are scheduled together on the same host. Pods are the basic building blocks of a Kubernetes application.
4. Steps to Create Your First Pod with Minikube 🚢
Step 1: Create a YAML Configuration
- Create a YAML file that defines the pod specification. For example, you can create a file named nginx-pod.yaml with the following content:
apiVersion: v1
kind: Pod
metadata:
  name: ngnix
  label:
spec:
  containers:
  - name: ngnix
    image: nginx:1.14.2
    ports:
    - containerports: 80
This YAML defines a simple Pod running an Nginx container.
Step 2: Apply the Configuration
Apply the configuration to your Minikube cluster:
kubectl apply -f my-pod.yaml
Step 3: Check Your Pod
You can check the status of your pod:
kubectl get pods
This will display your "my-pod" with its current status.
Step 4: Access Your Pod
To access your pod externally, you can expose it:
kubectl expose pod my-pod --type=NodePort --port=80
This makes your pod accessible via a NodePort service.
Step 5: Access Your Pod
Determine the NodePort:
kubectl get svc
You can access your Nginx pod using http://<Your-EC2-Public-IP>:<NodePort> in your web browser.
You've now successfully created your first Pod on Minikube! 🎈
In this blog, we've explored Minikube, installed it on an AWS EC2 Ubuntu instance, defined what a Pod is in Kubernetes, and created our first Pod using Minikube. This is just the beginning of your journey into the world of Kubernetes and DevOps. 🌍✨
Happy containerizing! 🐋💡