Advance Git & GitHub for DevOps Engineers: Part-2 | #Day11 | #90daysofdevops


Introduction:
As a DevOps engineer, you'll often work with version control systems like Git to manage code repositories efficiently. Git is a powerful distributed version control system that allows teams to collaborate on projects seamlessly. In this blog, we will delve into two essential Git features: Stash and Cherry Pick. These functionalities are particularly useful when you need to manage changes in your codebase effectively. Let's explore each of them step by step.
Git Stash & its process:
Git stash is a feature that enables you to temporarily store changes you've made to your working directory, enabling you to switch branches or perform other actions or if you have to work on some other project without committing your changes.
Stashing is ideal when you're in the middle of some work, but you need to switch contexts without committing to half-done work.
Process:
Step 1: Check Your Working Directory Status Before stashing, it's essential to ensure there are uncommitted changes in your working directory. Use the following command to check the status:
git status
Step 2: Stash Your Changes Once you have confirmed there are changes you want to stash, use the following command:
git stash save "Descriptive message for your stash"
This command will save your changes and give them a descriptive message for easy identification later.
Step 3: Verify Your Stash List To view the list of stashes you've created, use the following command:
git stash list
Step 4: Apply or Reapply Your Stash To apply the most recent stash and restore your changes, use the following command:
git stash apply
If you have multiple stashes and want to apply a specific one, use the following command:
git stash apply stash@{stash_index}
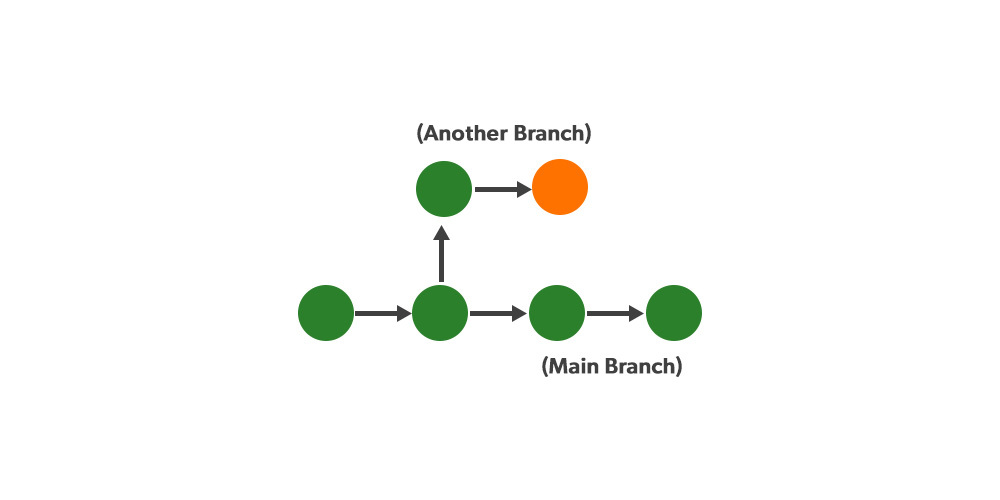
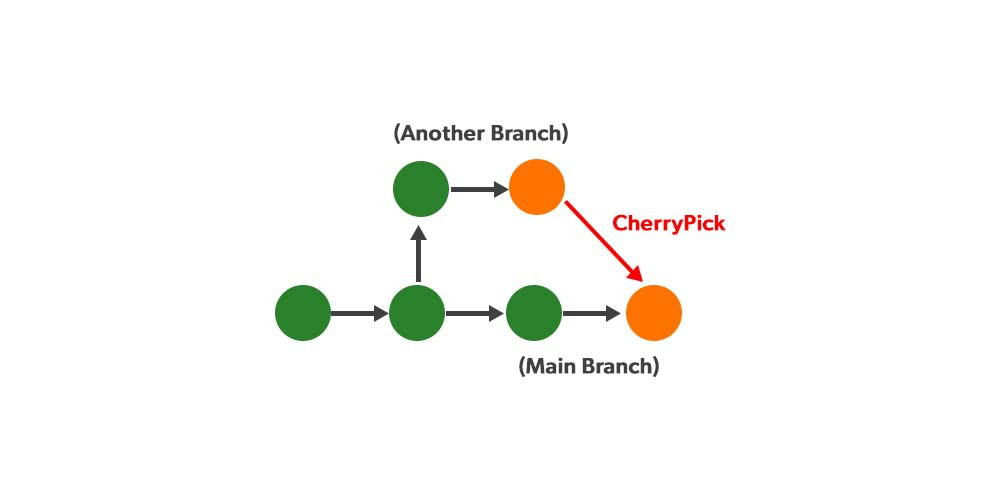
Git Cherry-Pick:
Cherry-picking in git means choosing a commit from one branch and applying it to another branch. This is in contrast with other ways such as merge and rebases which normally apply many commits into another branch.
Cherry picking is an advanced version of rebase in git, mainly it is used when we don't want to merge the whole branch into another branch but only want to pick and merge one commit then we will use the power of cherrypick.
Process:
Step 1: Identify the Commit First, identify the commit you want to cherry-pick. Use the following command to view the commit history:
git log
Step 2: Switch to the Target Branch Make sure you are on the branch where you want to apply the commit. Use the following command to switch branches:
git checkout target_branch
Step 3: Cherry-Pick the Commit Now, cherry-pick the commit you identified earlier using the following command:
git cherry-pick <commit_hash>
Step 4: Resolve Conflicts (if any) In some cases, Git may encounter conflicts during the cherry-pick process. You'll need to resolve these conflicts manually. Git will mark the conflicting files with conflict markers (<<<<<<<, =======, and >>>>>>>). Edit the files to resolve the conflicts and save the changes.
Step 5: Commit the Cherry Pick Once you've resolved the conflicts, commit the cherry-picked changes to the target branch using:
git commit
Task-1: Now let's check how we can implement git stash in the real-world scenario.
- Create a new branch and make some changes to it:
# Assuming you're on the main/master branch
git checkout -b new-branch
# Make some changes to your files
git add .
git commit -m "Made changes on the new-branch"

- Use git stash to save the changes without committing them:
# Suppose you have some changes you don't want to commit on the new-branch
git stash save "Temporary changes on new-branch"

- Switch to a different branch, make some changes, and commit them:
# Switch to a different branch (e.g., main/master)
git checkout main
# Make some changes to your files
git add .
git commit -m "Made changes on the main branch"

- Use git stash pop to bring the changes back and apply them on top of the new commits:
# Switch back to the new-branch where you stashed the changes
git checkout new-branch
# Apply the changes you stashed earlier on top of the new commits
git stash pop


Task 2: Using git cherry-pick
Let’s see how we can use git cherry-pick in a real scenario. Here are the steps I followed for this task:
a. In version01.txt of the development branch add the below lines after “This is the bug fix in development branch” that you added in Day10 and reverted to this commit.
git checkout development # switch to the development branch
echo "Line2.1>> After bug fixing, this is the new feature with minor alteration" >> version01.txt # append some text to the file
Task 2: Using git cherry-pick
Let’s see how we can use git cherry-pick in a real scenario. Here are the steps I followed for this task:
a. In version01.txt of development branch add the below lines after “This is the bug fix in development branch” that you added in Day10 and reverted to this commit.
git checkout development # switch to the development branch
echo "Line2.1>> After bug fixing, this is the new feature with minor alteration" >> version01.txt # append some text to the file

b. Commit this with the message “ Added feature2.1 in development branch”
git add version01.txt # stage the file for commit
git commit -m "Added feature2.1 in development branch" # commit the changes with a message

c. Line3>> This is the advancement of the previous feature
echo "Line3>> This is the advancement of previous feature" >> version01.txt # append some more text to the file

d. Commit this with a message “ Added feature 3 in development branch”
git add version01.txt # stage the file for commit
git commit -m "Added feature3 in development branch" # commit the changes with a message


e. All these commits messages should be reflected in the Production branch too which will come out from the Master branch.
git checkout master # switch to the master branch
git checkout -b production # create and switch to a new branch called production based on master
git rebase development # rebase the production branch onto the development branch, replaying all the commits from development on top of production

f. In the Production branch Cherry pick Commit “Added feature2.2 in development branch” and added the below lines in it:
git cherry-pick -e <commit-hash> # cherry pick the commit with hash <commit-hash> and edit the message before applying it
# In the editor, add below lines after Line3>> This is the advancement of previous feature
Line4>>Added few more changes to make it more optimized.
# Save and exit the editor to complete the cherry pick operation

This is the result you will finally receive after git stashing. Either you finish the codebase file, and then kindly use these instructions to finish the process.
As a result, your "new-branch" now contains the earlier changes you made, and the "main" branch's changes are also maintained.
If the modifications in the stash and the changes in the branch you are applying them to contain conflicts, keep in mind that using git stash pop may result in conflicts. In certain circumstances, Git will prompt you to manually resolve the conflicts.
Instead of using git stash pop, use git stash apply to apply the stash while retaining it in the stash list.
Conclusion:
Git stash and cherry-pick are powerful tools in a DevOps engineer's arsenal to effectively manage code changes and collaborate efficiently with the team. Stash helps you temporarily store your changes, while cherry-pick allows you to pick specific commits and apply them to other branches. Mastering these Git functionalities will undoubtedly boost your productivity and make you a more effective DevOps engineer. Happy coding!
That's all for today!
See you in next blog.
#trainwithshubham #Devops #devopsjourney #devopscommunity #git.